Camera System Documentation
Version: 0.7 Early Access
Installation and Setup
The Riveting Realms camera system is designed to be easy to set up and get started with. You can be up and running in minutes.
Supported Unreal Versions and Platforms
- Precompiled binaries (included with the camera plugin standard license) compatible with Unreal packaged and source builds (with some minor UBT source modifications for the latter described below), are provided for Windows, Mac, Linux, Android, and iOS.
- Unreal versions spanning from UE 4.25 onward (up to and including UE 5.7) are supported for Windows, Linux, and Android, with precompiled binaries/object files built using the associated canonical compilers/toolchains.
- Mac and iOS are currently supported for UE 5.6 or later.
- Xcode 16.1 or later is required for Engine source builds (this is the oldest version still supported by Apple for shipping products as of March 2026).
- UE 5.6 is the oldest version of UE with official 16.1 support.
- Apple will require Xcode 26 for new App Store submissions starting late April 2026. Mac/iOS support for UE versions compatible with Xcode 26 will be evaluated as those engine versions become available.
- Building/releasing for other platforms/build configurations/etc., (including any/all game consoles), is supported by project and studio source licenses. Contact us for more information, and/or to acquire a license with source access for your project.
Basic Installation
- Acquire the plugin, if you haven't already:
- Unzip the contents of the downloaded plugin files, and place them in the UnrealEngineInstallDirectory/Engine/Plugins/Marketplace directory.
- If the Marketplace folder doesn't exist yet under Engine/Plugins, you may need to create it.
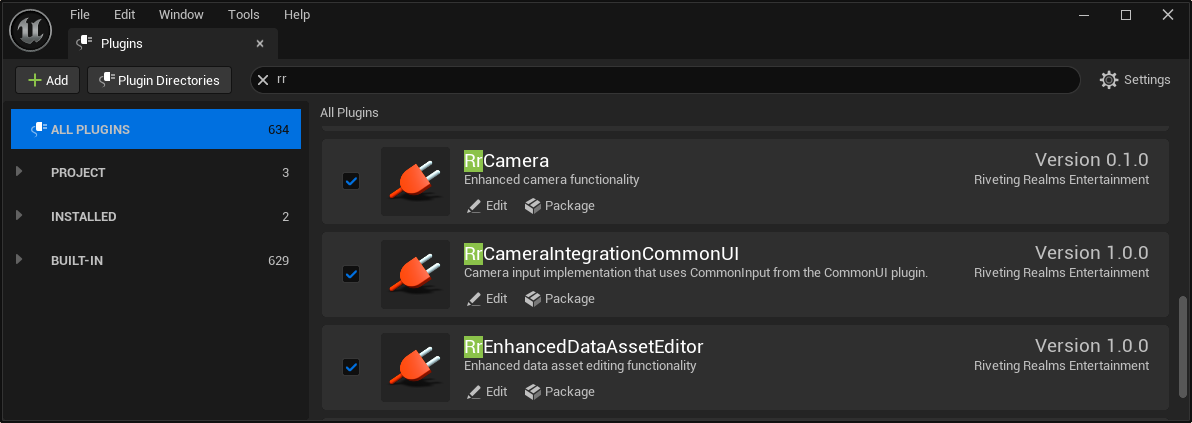
- Start the editor and enable the plugin(s).
- Edit → Plugins → Enable the RR camera plugin, and restart the editor.
Optional Enhancements
- If you would like the enhanced UI experience while editing camera styles, download, install and enable the free Riveting Realms Enhanced Data Asset Editor plugin from the Unreal Fab marketplace.
- NOTE: This plugin is distributed separately due to Unreal EULA restrictions on distribution of plugins that modify engine code and/or link against editor libraries.
- For real-time feedback when editing all camera values - including when clicking-and-dragging component values of vectors and rotators - add the following setting to your Editor.ini (ex., YourGameFolder/Config/DefaultEditor.ini):
[ConsoleVariables]
Slate.bAllowThrottling=0
Game Project Integration
- The RR camera system integrates as a layer between your game, and the engine's default behavior.
- It does this by extending classes that are part of the engine to add/replace built-in functionality.
Player Controller Settings
- In order to use the RR camera system, your player controller class must be set to use the RrPlayerCameraManager, or a custom Blueprint or C++ class whose parent is RrPlayerCameraManager.
- (Optional) RrCameraPlayerController exposes useful camera functions directly on the player controller.
- To gain access to this functionality, change your player controller class in Blueprint or C++, whose parent is currently PlayerController, to derive from RrCameraPlayerController instead.
- (Optional) The RrCameraDebugController provides functionality for in-depth debugging of camera modes while the debug camera is active (typically bound to ; (semicolon) while playing).
- To use it, change the debug camera controller class on your cheat manager to RrCameraDebugController, or, if you already have a camera debug controller, change its parent from DebugCameraController to RrCameraDebugController.
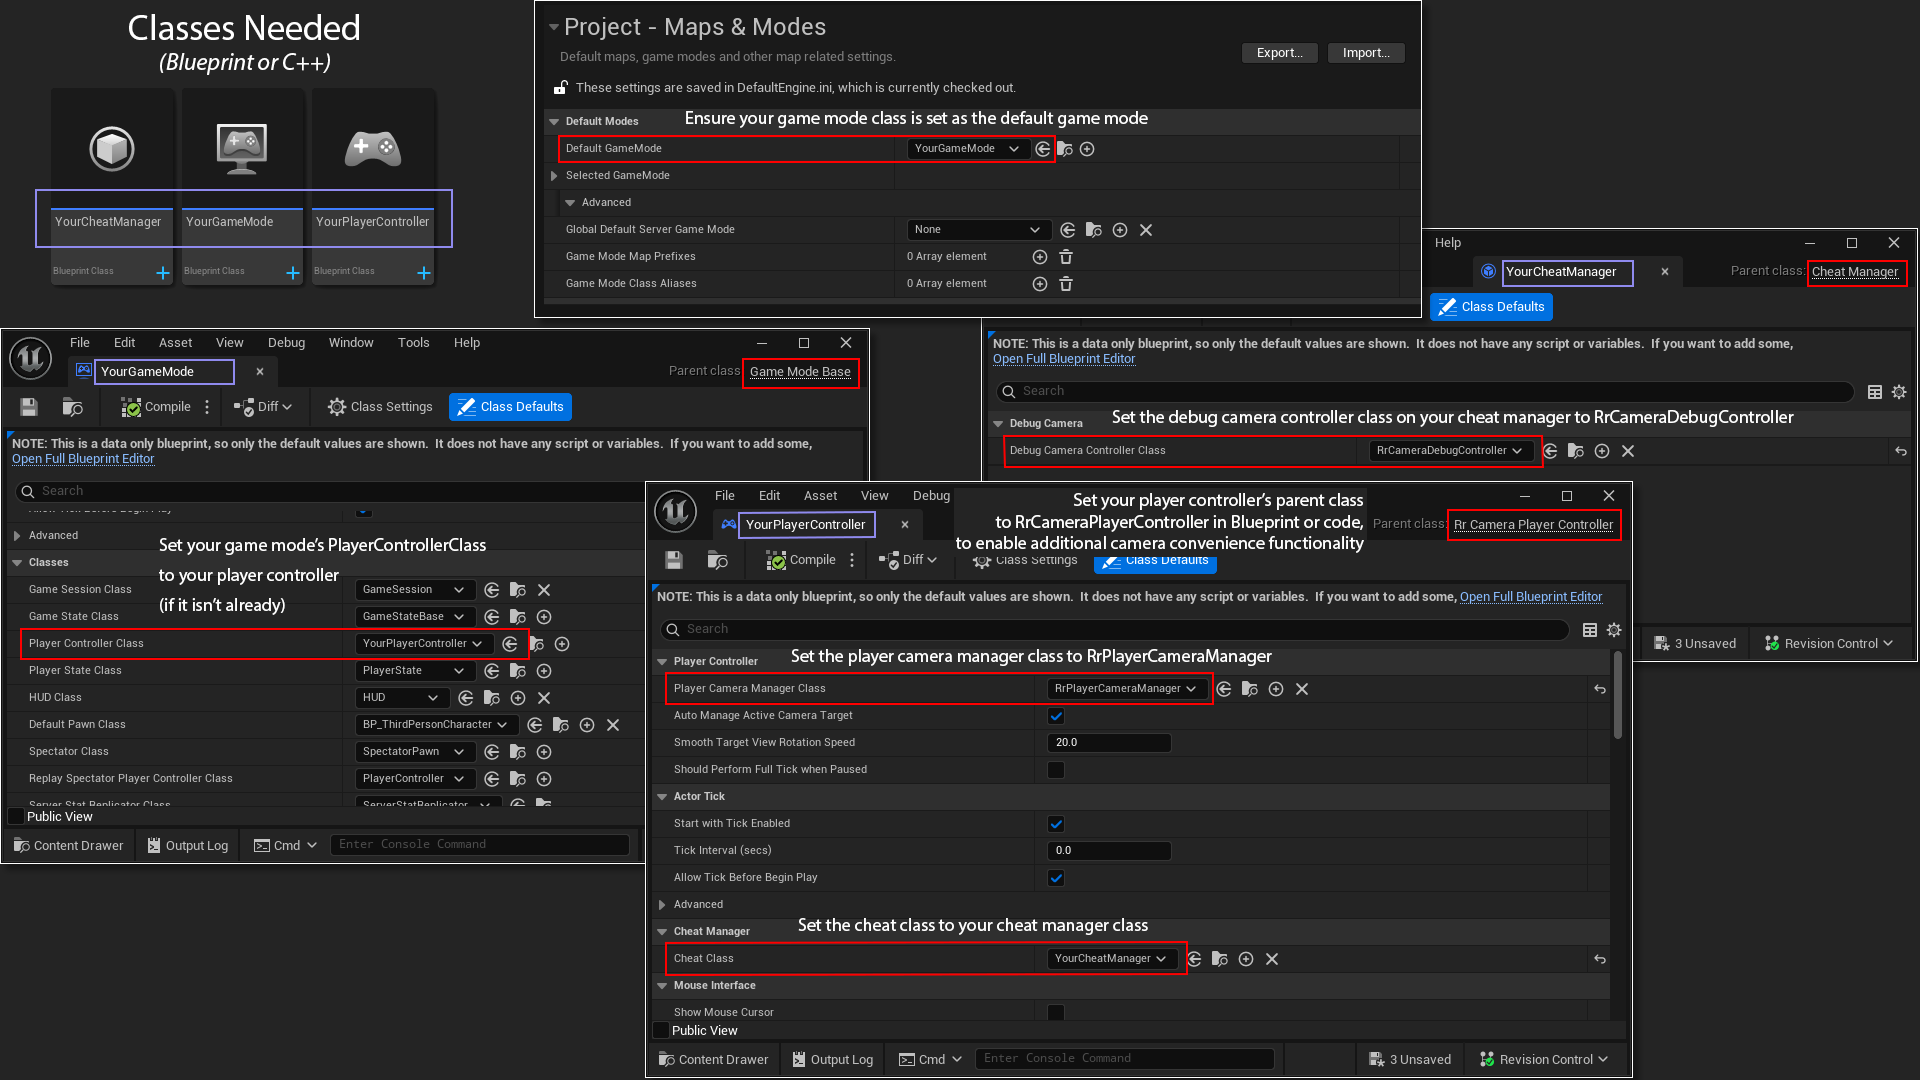
- If your game doesn't have a cheat manager class yet, you can create one and set it to be used by your player controller, as in the example setup image shown below.
Example Configuration
A sample setup using Blueprints, as shown in the image below:
- YourGameMode is a Blueprint derived from GameModeBase, and is set as the default game mode for the project.
- Note that individual levels can also override the game mode, so setting the default may not set the game mode in all cases.
- YourPlayerController is a Blueprint derived from RrCameraPlayerController, which allows functionality provided by the RR camera player controller to be used.
- The PlayerCameraManagerClass is set to RrPlayerCameraManager.
- The CheatClass is set to YourCheatManager.
- YourCheatManager is a Blueprint derived from CheatManager.
- The DebugCameraControllerClass is set to RrCameraDebugController.
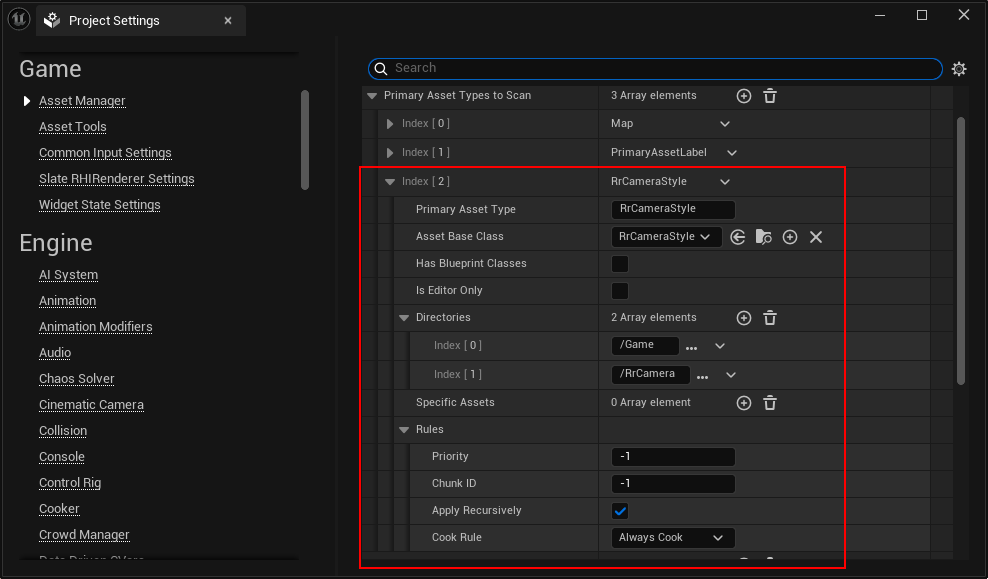
Set up camera styles for cooking
- You can add the below snippet to your DefaultGame.ini, or configure this through the editor.
[/Script/Engine.AssetManagerSettings]
+PrimaryAssetTypesToScan=(PrimaryAssetType="RrCameraStyle",AssetBaseClass=/Script/RrCamera.RrCameraStyle,bHasBlueprintClasses=False,bIsEditorOnly=False,Directories=((Path="/Game"),(Path="/RrCamera")),SpecificAssets=,Rules=(Priority=-1,ChunkId=-1,bApplyRecursively=True,CookRule=AlwaysCook))
+DirectoriesToAlwaysCook=(Path="/RrCamera")
- The above setting will include all camera styles from your game, and the RR camera styles as well. You can adjust the filter to exclude RR styles and/or only look for camera styles in certain folders.
- NOTE: If you exclude RR camera styles from packaging, make sure you replace any referenced RR styles and other assets in the camera settings with replacements/copies in your game as well, to ensure everything works properly.
Using the precompiled/standard plugin with source versions of the Unreal Engine
- If you are using a source version of the Unreal Engine, you may need to modify UnrealBuildTool to build successfully with the precompiled/standard version of the plugin.
- To point UBT at the correct intermediate directory for the precompiled camera plugin, add the code block indicated by RR BEGIN/RR END below to the GetModuleIntermediateDirectory() function in UEBuildTarget.cs, after ModuleConfiguration is set:
	private DirectoryReference GetModuleIntermediateDirectory(ModuleRules ModuleRules, UnrealArchitectures? Architectures)
	{
		// Get the root output directory and base name (target name/app name) for this binary
		DirectoryReference BaseOutputDirectory = GetBaseOutputDirectory(ModuleRules);

		// Get the configuration that this module will be built in. Engine modules compiled in DebugGame will use Development.
		UnrealTargetConfiguration ModuleConfiguration = Configuration;
		if (Configuration == UnrealTargetConfiguration.DebugGame && !ModuleRules.Context.bCanBuildDebugGame && !ModuleRules.Name.Equals(Rules.LaunchModuleName, StringComparison.InvariantCultureIgnoreCase))
		{
			ModuleConfiguration = UnrealTargetConfiguration.Development;
		}

		// RR BEGIN - For precompiled plugins (such as the RR camera standard plugin), use the plugin's intermediate directory.
		if (ModuleRules.Plugin != null &&
			ModuleRules.bUsePrecompiled &&
			ModuleRules.Plugin.Type != PluginType.External &&
			!ModuleRules.Plugin.bExplicitPluginTarget)
		{
			DirectoryReference PluginIntermediateDirectory = DirectoryReference.Combine(
				new DirectoryReference(ModuleRules.PluginDirectory),
				GetPlatformIntermediateFolder(Platform, Architectures, false),
				GetTargetIntermediateFolderName(ModuleRules.Target.Type == TargetType.Editor ? "UnrealEditor" : "UnrealGame", IntermediateEnvironment),
				ModuleConfiguration.ToString(),
				ModuleRules.Name);

			return PluginIntermediateDirectory;
		}
		// RR END

		...
	}
Camera Styles
- Camera styles represent distinct modes of operation for the camera system.
- In addition to a default/navigation camera style, your game may want to make use of additional, distinct styles for different navigation modes, gameplay functions, and scripted interactions. Typically these will correspond to features/modes of play in your game.
- For example, depending on the type of game you're making, you may want to have camera styles separate from your default camera defined for modes of gameplay such as Swimming, Ladder Climbing, NPC Interaction, and Cover.
- The RR camera plugin allows you to build these styles separately, and let the camera system handle smooth blending between them automatically.
- In addition to a default/navigation camera style, your game may want to make use of additional, distinct styles for different navigation modes, gameplay functions, and scripted interactions. Typically these will correspond to features/modes of play in your game.
- Camera styles are composed of smaller, reusable pieces of camera functionality - CameraTraits - which are described below.
Adding Initial Camera Styles
While you can make camera styles from scratch, the easiest way to get started is to copy an existing sample style provided with the plugin, and start modifying it from there to get the exact behavior that you want.
- Riveting Realms-authored sample styles can be found in the plugin's content folder, and are prefixed with Rr to avoid style name conflicts with any styles you might create for your project.
- Some example styles included with the plugin:
- RrThirdPerson - This style is designed to be a good starting style for a 3rd person navigation camera.
- RrOverTheShoulder - This style is designed to be a good starting point for a 3rd person over-the-shoulder camera, such as those found in shooting games.
- RrLookAt - This style is designed to be a good starting point for building camera styles that look at a target, such as lock-on-target cameras, or cameras that look at POIs.
- Other provided utility styles that are used by default, but can also be changed in the Riveting Realms Camera System settings:
- RrCameraActor - This is the default style used when the view target is set to a camera actor, such as when a Sequencer camera is active.
- RrFixed - This style replaces the engine built-in functionality when using the fixed camera style.
- RrOriginRelative - This style sets the origin rotation based on the view target actor's attach target or movement base, and is used to demonstrate example 6-DOF capability.
- Styles starting with RrDebug... - These are used by the enhanced camera debugger. More information about using the debugger can be found below.
- Some example styles included with the plugin:
- To test out any of these styles, you can use the engine's built in camera stylename command to switch to the style for debug testing/preview while playing the game.
- For example, the console command camera RrThirdPerson switches/blends to the 3rd person example camera style provided with the plugin.
- Information on switching styles via other methods is provided below.
- When you find a useful style to serve as a basis point for your camera, an easy way to get started is to copy that file into your own project's content folder, and rename it to something unique, using the following naming convention: CameraStyle_StyleName.
- The name of the camera style asset is the name it will be referenced by in Blueprint, etc.
- CameraStyle_Default is recommended for the default camera style, but you can change the default style name in the camera system settings if desired.
Live Editing with Play-In-Editor
- You can make changes to any of the configurable properties of a camera style while using Unreal's Play-In-Editor (PIE), just by editing the properties of the associated camera style asset.
- This also works while the game is paused, and even when using the camera debugger.
- Traits included with the plugin are also built to be able to handle being added-to/removed-from the style, and enabled/disabled dynamically during play.
- If you have disabled Slate throttling as described in the Setup section, you can also click-and-drag on any property value that supports it, and see the effects in real-time.
Setting/Switching Styles
- The RR camera plugin hooks into existing functionality for setting the camera style, but also extends it for more developer control.
- For debugging purposes, you can change styles with the camera StyleName debug command.
- For setting/switching the style in Blueprint or C++, you can use SetCameraStyle, PushCameraStyle, and PopCameraStyle with or without a transition/blend.
- These functions are exposed on the RrPlayerCameraManager, and also via forwards on RrCameraPlayerController (if your player controller class derives from it).
- Pushing/popping of camera styles refers to the camera style stack, described below.
- The engine's built-in PlayerController functions SetCameraMode, ClientSetCameraMode, and ResetCameraMode are also supported.
Camera Style Stack
- The RR camera manager maintains a stack of camera styles, allowing you to push a style to switch to it, and then pop back to whatever the previous style was, when you want to switch back.
- This helps to simplify the camera logic in many scenarios by not requiring your code/BP logic to know/remember what the previous camera style was.
- If you set the camera style, it's equivalent to resetting/clearing the stack, and then pushing just that one style that's being set.
- The engine built-in set/reset camera mode functions are also considered "set" operations.
Smooth Blending
The camera system is designed to blend smoothly between camera styles.
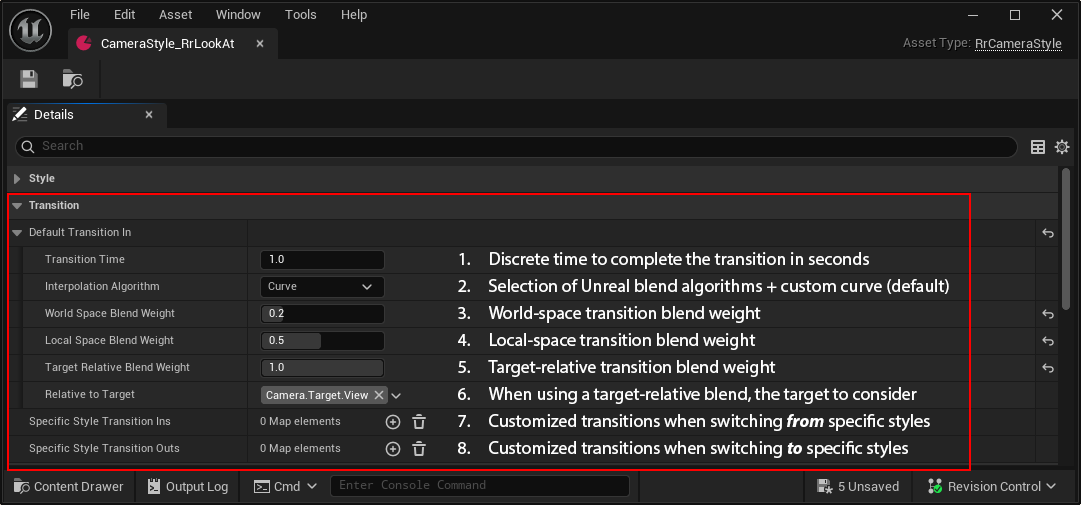
- To achieve a smooth blend, simply set the style's Default Transition In → Transition Time to the amount of time in seconds you would like the transition to that style to take. Or set it to zero for a camera cut.
- In some scenarios/functions, a transition time less than zero - such as -1.0 - is used to indicate that the default transition time for that style should be used.
- To override the default blend-in time of a camera style, you can set SpecificStyleTransitionIns and SpecificStyleTransitionOuts to use a different blend for a specific style-to-style combination.
- While the ability to set both custom transition-in and transition-out settings are provided for convenience, only one transition configuration can be used at a time. In the case where both are specified, the camera system will use the "transition-in" setting.
Blend Algorithms
By default, the RR camera system uses a custom curve to define the transition between styles. But, if desired, you can also use any of the base blend algorithms provided by the engine.
- Curve - This is the default blend style for RR cameras; uses a custom-tuned curve asset to map the transition from one camera/camera style to another.
- *In newer versions of the engine, you can refer to the curve blend algorithm in some engine camera/view target functions that take an EViewTargetBlendFunction parameter, by selecting VTBlend_PreBlended.
Blend algorithms provided for compatibility with the base engine:
- Linear - Simple linear blend.
- Cubic - Uses cubic interpolation.
- Ease in Out - Ease in and out algorithmically.
- Ease In - Ease in, linear out.
- Ease Out - Linear in, ease out.
Blend Settings Example
- Transition Time - The amount of time taken to complete the transition to the camera style, from another camera/style.
- Interpolation Algorithm - The algorithm used when blending between styles.
- World Space Blend Weight - The weight given to world-space blending.
- Local Space Blend Weight - The weight given to camera-local space blending.
- Target-Relative Blend Weight - The weight given to blending in target-relative space (blending based on where the target is in camera space).
- Relative to Target - Allows you to specify which target target-relative blends apply to.
- Yaw Direction Bias - Allows you to bias whether the transition goes left or right for base/Euler transitions (With a bias of zero, the transition always takes the shortest path/rotation).
- Override Transition Curve - When using the Curve interpolation algorithm, allows you to override the default transition curve (which is set in the camera settings).
- Set Initial Rotation to Match Outgoing View - For camera styles that allow free-look, attempt to set the initial camera rotation to a rotation that matches the outgoing style (enabled by default).
- Rotation Transform Type - By default, transitions use the camera style's Primary Rotation Transform Type (Base or Origin) to decide which transform type to apply any rotation transition in. This setting permits overriding it.
- Specific Style Transition-Ins - Allows you to define custom transitions when switching to this camera style from other specific styles.
- Specific Style Transition-Outs - Allows you to define custom transitions when switching away from this style to other specific styles.
Camera Volumes
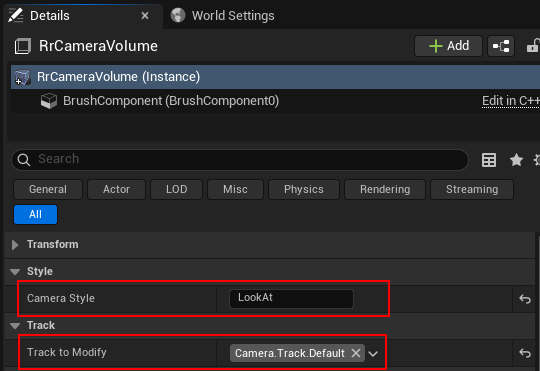
- RrCameraVolume is a placeable volume that pushes a style specified by its CameraStyle property onto the style stack a player enters it, and pops the style back off the stack when the player leaves.
- You can also optionally specify a camera track to apply the setting to.
- If this is none/left blank, the camera style will be pushed to the default track.
Camera Traits
- Camera Traits are individual pieces of camera logic that are designed to be combined together to compose the overall output of a camera style.
- Traits make their contribution to the overall behavior of the style, by making changes to the transforms of the the camera track currently being updated.
- The traits execute in order, and are not aware of each other, so ordering does matter.
- A simple way to think about it when determining order, is what (if any) other traits its functionality might depend on having already been factored in.
- As an example, the Collision Avoidance trait needs to know where you otherwise want the camera to be in order to adjust the final location of the camera properly - so collision avoidance should be placed after any other traits that move the camera, that you want collision to care about.
- Because this is intended to be a dynamic, customizable system that supports any sort of custom traits developers might want to create - that could serve any function, and need to be ordered in any possible way - we don't hard-code dependency order, and instead leave it up to the developer.
Traits Included with the Plugin
| Trait Name | Description |
|---|---|
| Attachment | Attaches the camera to a target. (Optionally sets camera track base location/rotation/FOV/aspect ratio/post-process). |
| Auto-Steer/Follow | When the user is not providing look input, automatically and smoothly rotates/drags the camera along to provide a better view. |
| Collision Avoidance | Performs traces against the world to detect current/impending camera collisions, and pulls the camera forward as necessary. |
| FOV by Angle | Sets the FOV of the camera based on a horizontal or vertical FOV angle. |
| FOV by Lens | Sets the FOV of the camera based on equivalent lens settings. |
| FOV from Previous Style | Maintains the FOV and aspect ratio the previous camera was using. |
| Limit Rotation | Limits the camera rotation to prevent over-rotation along one or more axes. |
| Look At | Sets the camera rotation to place a target at a specified point on the screen, or constrain it within a defined region. |
| Look Input | Adjusts the base rotation of the camera based on user input. |
| Offset/Jib | Offsets the camera transform from the base transform. This is a simple but easy way to implement camera arm functionality, etc. |
| Smooth Motion/Stabilization | Continuously smooths the motion of the camera by interpolating the current value toward the target. Can also be used to smooth the location of target(s) on the screen. Introduces damping/lag to the associated output. |
| Trait Container | Contains an array of sub-traits, that can be turned on and off dynamically while the style is active. |
Attachment Trait
Sets the camera's base transform by attaching it to a camera target. This is typically the first trait in a camera style, establishing the base location and/or rotation that subsequent traits build on.
Configurable Properties
| Property | Description |
|---|---|
| Attach Target | The camera target to attach to. Defaults to the view target (Camera.Target.View). |
| Set Location | Sets the camera base location to the target's location. Enabled by default. |
| Set Rotation | Sets the camera base rotation to the target's rotation. Disabled by default - most third-person cameras derive rotation from look input rather than the character's facing direction. |
| Rotation Transform Type | When setting rotation, determines whether to apply it to the Base (Euler/standard) or Origin (6-DOF) transform. |
| Use Actor Attach Parent or Movement Base Rotation | When setting rotation, source it from the target actor's attach parent or movement base rather than the actor itself. Useful for moving platforms, etc. |
| Set Rotation as Origin Normal | When setting the origin rotation, interprets the rotation as a surface normal/up-vector rather than a directional rotation. Only valid when targeting the origin transform. |
| Set FOV | Sets the camera FOV from the target. |
| Set Aspect Ratio | Sets the camera aspect ratio from the target. |
| Set Post Process | Applies post-process settings from the target. |
Attachment Trait Considerations
- Note that FOV, Aspect Ratio, Post Process, and in some cases Rotation may not be sourced/set for all targets. The Attachment trait will not be able to set these if the target does not provide them.
- The Attachment trait should generally be one of the first in a camera style, as some other traits (ex., Look-At, Smooth Motion, Collision Avoidance, etc.) depend on the base transform and/or offsets already being set to apply their effects properly.
- If multiple camera tracks are being used, the attachment trait can optionally use the POV output of another track for attachment, rather than a regular camera target.
- To do this, set the Attach Target to a track name instead of a target name (eg., Camera.Track.YourTrackName).
- Note that the track order update will be adjusted to ensure the dependent track updates after the track it depends on.
Auto-Steer/Follow Trait
When the player is not providing look input, automatically rotates the camera to maintain a useful view behind the follow target. Composed of two independent behaviors - drag and auto-rotation - that can be enabled separately.
Configurable Properties
| Property | Description |
|---|---|
| Follow Target | The target to follow. Typically the same as the attachment target. Defaults to the view target. |
| Follow Start Delay | How long after the player last provided look input before following behaviors begin to ramp in. |
| Follow Percentage | The maximum strength of the follow effect, from 0–100%. |
| Follow Ramp In Factor | How quickly the follow effect ramps in after the delay period. |
| Enable Drag Behind Target | When enabled, drags the camera behind the follow target as it moves. |
| Target Drag to Pitch | The pitch the camera settles toward when dragging. |
| Drag Length | The length of the virtual chain used to compute drag behavior. Longer values produce a more gradual drag. |
| Enable Auto Rotation at Corners | When enabled, automatically rotates the camera when the target approaches a wall or corner. |
| Auto Rotation Distance Threshold | How close the target must be to a wall before auto-rotation activates. |
| Corner Rotation Smooth Alpha | How much the smoothed rotation value catches up to the target per smooth time unit. |
| Corner Rotation Smooth Time | The time period over which the smooth alpha is applied. |
| Auto Rotation Adjustment | The minimum and maximum angle range that auto-rotation is permitted to apply. |
| Instance Data Name | Name used to share instance data across camera styles, allowing the auto-steer state to persist through style transitions. |
Auto-Steer/Follow Trait Considerations
- The drag behavior works by computing the direction from the follow target to the camera and gradually rotating toward that direction, so it depends on the camera's base location already being set. Place this trait after the Attachment trait.
- The auto-rotation at corners feature uses asynchronous physics checks against the environment to detect when the target is approaching a wall, and rotates the camera away from it. This is a useful complement to Collision Avoidance but operates independently.
- Instance data is named AutoSteer by default. If you would like the auto-steer state - including tracked time since input, and current follow percentage - to persist smoothly across a style transition, ensure both styles use the same instance data name.
Collision Avoidance Trait
Performs a trace against the world to detect when the camera is colliding with or about to collide with geometry, and pulls the camera forward toward a collision-safe target as necessary. Also includes optional environmental awareness to preemptively adjust the camera position as it approaches walls and other obstacles.
Configurable Properties
| Property | Description |
|---|---|
| Enable Collision Trace | Enables tracing back from the collision-safe target to the current computed/final camera position, and offsetting the camera position to adjust as needed. |
| Transition Collision | When enabled, collision support remains active during style transitions. |
| Collision Safe Target | The target to pull in toward when a collision is detected. Defaults to Camera.Target.CollisionSafe. |
| Arm Offset Percentage | Offsets the safe target to pull the camera straight forward rather than toward the target location. Most useful when combined with environmental awareness and a safe clearance distance. |
| Collision Trace Size | The radius of the collision trace sphere. |
| Smooth Pull Back | When enabled, smooths the camera's return to its desired position after a collision clears, rather than snapping immediately. |
| Max Pull Back Speed | When smoothing pull back, caps the speed at which the camera returns to its desired position. |
| Pull Back Smoothing Alpha | Controls how much the smoothed pull-back value catches up per smooth time unit. |
| Pull Back Smoothing Time | The time period over which the pull-back smoothing alpha is applied. |
| Enable Environmental Awareness | When enabled, preemptively adjusts the camera position as it approaches nearby geometry, before an actual collision occurs. |
| Max Environment Check Size | The maximum distance to check for nearby geometry when environmental awareness is active. |
| Safe Clearance Distance | The distance at which environmental awareness begins adjusting the camera position. |
| Smooth Pull In Alpha | The percentage of the environment check size used when pulling the camera in preemptively. |
| Instance Data Name | When set, allows pull-back smoothing state to be shared across similar camera styles. Unset by default. |
Collision Avoidance Trait Considerations
- This trait should be placed after any traits that set or modify the camera's location - including Attachment, Offset, and similar traits - so it knows the final desired camera position before adjusting for collisions.
- Environmental awareness uses a spline curve configured in the camera settings (Environment Collision Curve) to map how aggressively the camera pulls in as it approaches geometry. This can be tuned globally in the camera plugin settings.
- The Collision Safe Target actor is automatically updated/kept in sync with the view target actor if Auto Set Collision Safe Target is enabled in the camera settings (which is usually the desired behavior). For more specific control, the collision-safe target can be set manually.
FOV by Angle Trait
Sets the camera's field of view directly using a horizontal angle in degrees, with optional scale and additive adjustments.
Configurable Properties
| Property | Description |
|---|---|
| Set Base FOV | When enabled, sets the base FOV to the specified angle. |
| FOV | The horizontal FOV to set, in degrees. Must be > 0 and < 180. |
| FOV Scale | Multiplies the base FOV by this value. |
| FOV Adjustment | Adds or subtracts degrees from the FOV. |
| Use Custom Aspect Ratio | When enabled, sets a custom aspect ratio. |
| Aspect Ratio | The custom aspect ratio to use when enabled. Defaults to 16:9. |
| Constrain Aspect Ratio | Constrains the view to the specified aspect ratio, adding black bars as needed. |
| Set Aspect Ratio Axis Constraint | When enabled, sets which axis is maintained when using an unconstrained aspect ratio. |
| Aspect Ratio Axis Constraint | Whether to maintain vertical or horizontal FOV when the viewport aspect ratio doesn't match. |
FOV Trait Considerations
- The Constrain Aspect Ratio setting uses simulated black bars by default rather than actually constraining the render resolution, which avoids the performance cost of buffer reallocations during smooth aspect ratio transitions. This behavior is controlled by the Simulate Constrained Aspect Ratios setting in the camera project settings.
FOV by Lens Trait
Sets the camera's field of view using virtual camera lens parameters - sensor type and focal length - rather than a direct angle. Useful for cinematic cameras where lens equivalents are the preferred authoring unit, or for matching with real-world cameras/lens combinations.
Configurable Properties
| Property | Description |
|---|---|
| Sensor Type | The virtual sensor type, referenced by gameplay tag. |
| Focal Length | The virtual lens focal length in millimeters. |
| FOV Scale | Multiplies the computed FOV by this value. |
| FOV Adjustment | Adds or subtracts degrees from the computed FOV. |
| Use Custom Aspect Ratio | When enabled, sets a custom aspect ratio. |
| Aspect Ratio | The custom aspect ratio to use when enabled. |
| Constrain Aspect Ratio | Constrains the view to the specified aspect ratio, adding black bars as needed. |
| Set Aspect Ratio Axis Constraint | When enabled, sets which axis is maintained when using an unconstrained aspect ratio. |
| Aspect Ratio Axis Constraint | Whether to maintain vertical or horizontal FOV when the viewport aspect ratio doesn't match. |
FOV by Lens Trait Considerations
- Additional sensor types for FOV by Lens can be defined by adding Camera.Sensor.SensorTypeName gameplay tags and corresponding size entries in the camera plugin settings.
FOV from Previous Style Trait
Maintains the FOV and aspect ratio settings that were active in the previous camera style, rather than resetting to defaults on a style transition. Useful when you want to keep the FOV and aspect ratio the same as whatever the previous style/view was using, without having to specify it.
Limit Rotation Trait
Constrains the camera's rotation on any combination of axes, preventing over-rotation beyond configured limits. Also supports per-axis rotation speed limits to control how quickly the camera can rotate regardless of input.
Configurable Properties
Each individual rotation axis - Yaw, Pitch, and Roll - has these per-axis settings:
| Property | Description |
|---|---|
| Use Target Relative Limits | When enabled, applies rotation limits relative to a target's orientation rather than in world space. |
| Limit Relative Target | The target whose orientation is used as the reference frame when target-relative limits are enabled. Defaults to the view target. |
| Apply Limit | Whether to apply an angle limit on this axis. |
| Axis Limits | The minimum and maximum allowed angle in degrees for this axis. |
| Apply Speed Limit | Whether to apply a rotation speed limit on this axis. |
| Apply Speed Limit on Start | When enabled, the speed limit is enforced from the moment the style becomes active, rather than only once rotation begins. |
| Axis Speed Limit | The maximum rotation speed in degrees per second for this axis. |
Limit Rotation Trait Considerations
- Limits are applied to the base view rotation. Place this trait after any traits that modify the base rotation - such as Look Input - so limits are enforced on the final rotation rather than an intermediate value.
- Target-relative limits are useful for constraining how far the camera can rotate relative to a character or vehicle's facing direction, rather than constraining the rotation in world space.
- Speed limits are enforced per-frame based on delta time and are independent of the angle limits. Both can be active simultaneously on the same axis.
Look-At/Auto-Framing Trait
Rotates the camera to place a target at a specified position on screen, or constrains the target within a defined screen region. Useful for lock-on cameras, point-of-interest cameras, and any scenario where the camera needs to keep something in frame.
Configurable Properties
| Property | Description |
|---|---|
| Look-At Target | The name of the target to look at. Defaults to Camera.Target.LookAt. |
| Look-At Space | Which transform to modify when applying the look-at rotation - camera local space, base view (Euler), or origin (6-DOF). Defaults to matching the primary transform type set on the track. |
| Desired Position on Screen | The screen position to place the look-at target at, from −1 to 1 on each axis. (0, 0) centers the target. |
| Constraint Type | How to constrain the target to the screen - Point (snap to exact position), Rectangle, or Oval (keep within a region). |
| Screen Region Extent | When using Rectangle or Oval constraints, the size of the allowed region around the desired screen position. 1.0 represents the full screen width or height. |
| Max Yaw Angle to Target | The allowed yaw angle range between the camera and the look-at target. Applies to BaseView/Euler space only. |
| Max Pitch Angle to Target | The allowed pitch angle range between the camera and the look-at target. Applies to BaseView/Euler space only. |
Look-At/Auto-Framing Trait Considerations
- The Look-At Target is game/scenario specific, so it's not set automatically - it must be set in Blueprint or C++ using Set Target by Actor, Set Target by Location, or similar functions on the camera manager before this trait will have any effect.
- The Point constraint type rotates the camera to place the target at exactly the desired screen position each frame. The Rectangle and Oval constraint types only rotate the camera when the target moves outside the defined region, allowing more natural camera movement while keeping the target in frame.
- Max Yaw Angle to Target and Max Pitch Angle to Target act as a secondary constraint - if the desired screen position would cause the Look-At Target to be outside the allowed angle range relative to the camera facing, the trait will clamp the maximum rotation delta to these angles. This can be used to reduce rapid rotation while the camera is very close to a target with an off-.
- The look-at space setting determines which part of the camera transform is modified. For most gameplay cameras, the default or base view setting is appropriate. The origin setting is useful for 6-DOF scenarios.
Look Input Trait
Applies player look input to the camera rotation, with support for control stick acceleration and configurable behavior during style transitions.
Configurable Properties
| Property | Description |
|---|---|
| Control Rotation Scale | Scales look input speed horizontally (X) and vertically (Y). |
| Rotation Transform Type | Which camera transform look input modifies - base view, origin, or default/inherited from the track. |
| Input Axis X | Which rotation axis horizontal/X input controls. Defaults to Yaw. |
| Input Axis Y | Which rotation axis vertical/Y input controls. Defaults to Pitch. |
| Transition Behavior | How input behaves during style transitions - fully enabled, fully disabled, or scaled proportionally with the transition progress. |
| Only Update for Active Track | When enabled, input is only applied when this track is the active camera track. |
| Use Control Stick Acceleration | Enables additional rotation acceleration when the control stick is pushed past a threshold. |
| Control Stick Acceleration Threshold | How far the stick must be pushed (0–1) before acceleration kicks in. |
| Control Stick Acceleration | The additional horizontal and vertical acceleration in degrees/sec, scaled by stick input. |
| Max Added Control Stick Speed | Caps the maximum additional speed that stick acceleration can contribute. |
| Instance Data Name | Name used to share look input state across styles. Defaults to LookInput. |
Look Input Trait Considerations
- This trait should be placed before traits such as Limit Rotation and Collision Avoidance, that depend on the rotation being updated to work properly.
- Control stick acceleration is separate from the base input scaling in Control Rotation Scale
- The base scale always applies to all input types, while acceleration is added on top when stick input exceeds the threshold
- Sharing instance data between similar styles by using the same Instance Data Name, allows for preserving accumulated rotation speed through transitions when using control stick input acceleration.
- Mouse acceleration and other forms of input are normally handled by the operating system - so only control stick/virtual stick input needs to be explicitly handled by the camera system.
Offset/Jib Trait
Applies a location and/or rotation offset to the camera, in local, world, or target-relative space. A simple but flexible way to implement camera arm/boom behavior, shoulder offsets, and similar positional adjustments.
Configurable Properties
| Property | Description |
|---|---|
| Target Relative | When enabled, applies the offset relative to a specified target's orientation rather than in a fixed space. |
| Target | The target to apply the offset relative to, when target-relative mode is enabled. Defaults to the view target. |
| Offset Space | When not using target-relative mode, the space in which the offset is applied - local (camera-relative) or world space. |
| Location Offset | The location offset to apply. |
| Rotation Offset | The rotation offset to apply. |
| Include in Incoming Transitions | When enabled, this offset is factored into the automatic initial rotation matching when transitioning into this style. |
| Include in Outgoing Transitions | When enabled, this offset is factored into the automatic initial rotation matching when transitioning away from this style. |
| Scale by Base Pitch Curve | When enabled, scales the offset by a curve driven by the current base view pitch. Useful for offsets that should vary based on how far the camera is looking up or down. |
| Base Pitch Scale Curve | The curve used when pitch-based scaling is enabled. The X axis is the base view pitch angle, and the Y axis is the scale applied to the offset. Positive pitch values represent looking upward. |
Offset/Jib Trait Considerations
- This trait should normally be placed before traits such as Look At and Collision Avoidance so the offset is factored into those calculations.
- Include in Incoming Transitions and Include in Outgoing Transitions affect the automatic rotation matching that occurs when transitioning to styles with free rotation.
- In most cases, it's desirable to minimize camera rotation during transitions when possible (keep these enabled), but for some specific setups you may want to disable one or both of these to make the camera intentionally rotate by the offset amount when entering/leaving the style respectively.
- Multiple Offset traits can be stacked in a single camera style, which is useful for separating their effects - for example, a base shoulder offset and a separate pitch-driven camera boom length adjustment.
Smooth Motion/Stabilization Trait
Continuously smooths the camera's location, rotation, and/or FOV by interpolating toward a target value each frame. Introduces intentional damping/lag to produce more cinematic, stable camera movement. Can also be used to smooth the position of a target on screen rather than smoothing the camera transform directly.
Configurable Properties
| Property | Description |
|---|---|
| Smoothing Target | Which camera transforms are affected by smoothing - World Space, Base View, Camera Local, Origin, Origin and Base, Base and Local, or Position on Screen. |
| Targets | When using Position on Screen mode, the target or targets whose average screen position is smoothed. Multiple targets can be weighted and averaged. |
| Smooth Location | Enables location smoothing. |
| Smooth Rotation | Enables rotation smoothing. |
| Smooth FOV | Enables FOV smoothing. Disabled by default. |
| Include Base Offsets | When smoothing Base View or Origin and Base, includes base view offsets in the smoothed value. |
| Include Origin Offsets | When smoothing Origin or Origin and Base, includes origin offsets in the smoothed value. |
| Include Local Rotation Offset | When smoothing in World Space, includes the local rotation offset in the smoothed rotation. |
| Reset on View Target Change | Resets the smoothed values when the view target changes, so the camera will snap to the new target rather than interpolating. |
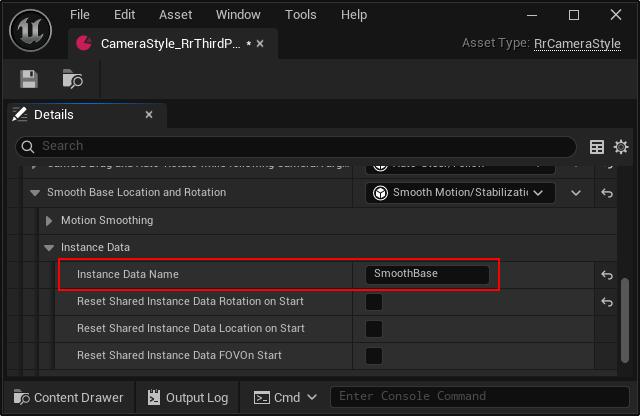
| Instance Data Name | When set to the same name for subsequently-active styles, allows the smoothing state to be maintained between them, for continuity through transitions. |
| Reset Shared Instance Data Rotation on Start | When sharing instance data, resets the cached rotation when the style begins. Enabled by default. |
| Reset Shared Instance Data Location on Start | When sharing instance data, resets the cached location when the style begins. Disabled by default. |
| Reset Shared Instance Data FOV on Start | When sharing instance data, resets the cached FOV when the style begins. Disabled by default. |
Location Smoothing Settings
| Property | Description |
|---|---|
| Use Per-Axis Location Settings | Enables independent smoothing settings for each axis. |
| Use Camera-Relative Axes | When using per-axis settings, treats X/Y/Z as camera-relative rather than world-relative axes. |
| Use Separate Negative Axis Settings | Allows different smoothing settings for movement in opposite directions along an axis - for example, adding more smoothing/lag when moving away from the camera than toward it. |
| Location Settings / Per-Axis Settings | Smoothing alpha and time values for location, either globally or per axis/axis direction. |
Rotation Smoothing Settings
| Property | Description |
|---|---|
| Use Per-Axis Rotation Settings | Enables independent smoothing settings for pitch, yaw, and roll. |
| Rotation/Pitch/Yaw/Roll Settings | Smoothing alpha and time values for rotation, either globally or per axis. |
FOV Smoothing Settings
| Property | Description |
|---|---|
| Include FOV Modifiers | When enabled, includes FOV modifier values in addition to the base FOV when smoothing. |
| FOV Settings | Smoothing alpha and time values for FOV. |
Smooth Motion/Stabilization Trait Considerations
This trait adds damping/lag - the camera will interpolate smoothly toward its target rather than snapping. The amount of damping/lag is controlled by the smoothing alpha and time values.
- Lower alpha values (smaller 0-1 percentage of the difference between previous and target) and/or longer times (more time in seconds to move that percentage of the difference) produce more lag, smoother movement, and can also make the camera feel "heavier".
The Position on Screen smoothing mode works differently from the other modes, by adjusting the camera location to smooth the position of a target on-screen. This is useful for keeping a target - often the view target/player - from snapping/moving too rapidly onscreen.
- Only location smoothing is supported in Position on Screen mode, as there is no direct equivalent for rotation/FOV.
The smoothing target selection determines which part of the camera transform is affected. World Space is the most common choice for general smoothing. Base View is useful for smoothing only the Euler rotation component.
When sharing instance data across styles, the reset options give fine-grained control over which cached values carry over. Resetting rotation on start is enabled by default, as the transition algorithm typically covers any needed rotation adjustment.
Multiple Smooth Motion traits can be stacked within a single style to smooth different aspects of the camera independently - for example, one instance smoothing location in world space and another smoothing position on screen.
- When using multiple forms of smoothing targeting the same values (ex. world-space location and screen position), it's typically desirable to use the same smooth alpha and time values for both to keep the overall effect synchronized.
Trait Container
Contains an array of sub-traits that can be enabled and disabled as a group at runtime, with optional blending. Covers edge-cases where using separate camera styles doesn't meet the needs of the particular camera setup.
Configurable Properties
| Property | Description |
|---|---|
| Traits Enabled by Default | Whether the contained traits start out enabled. Can be overridden at runtime by the instance data class. |
| Instance Data Class | The class used to dynamically control whether the contained traits are on or off. Can be subclassed in Blueprint or C++ to implement custom enable/disable logic. A built-in specialization URrCTID_ContainerOffDuringTransitions is provided, which automatically disables the contained traits during camera style transitions. |
| Instance Data Name | An optional name for the instance data, allowing it to be looked up and controlled at runtime. |
| Blend In | Blend parameters used when the contained traits are enabled - blend time, interpolation algorithm, and optional custom blend curve. |
| Blend Out | Blend parameters used when the contained traits are disabled. |
| Traits | The list of sub-traits contained in this container. |
Trait Container Considerations
Sub-traits within the container are updated in-order with the trait container itself, and other traits outside the container at the top level of a camera style.
- Ex. if the trait container is the 2nd trait in a style containing 3 traits, and the container contains subtraits "A" and "B", the trait update evaluation order would be: 1, 2.A, 2.B, 3.
- The same overall ordering considerations apply as with top-level traits - traits that depend on location or other transforms being set should be ordered accordingly within the container, and within the overall style.
The container's enabled state can be controlled at runtime in Blueprint or C++ by one of two methods:
- Look up the instance data for the trait by name using the Find Named Instance Data function on the associated camera track, and set/unset bTraitsEnabled on the instance data directly.
- Custom enable/disable logic can be implemented by subclassing URrCTID_Container in Blueprint or C++ and overriding the Update Traits Enabled function to set/unset bTraitsEnabled there.
- The provided URrCTID_ContainerOffDuringTransitions subclass demonstrates this pattern by disabling traits automatically during transitions, and enabling them otherwise.
To immediately enable/disable the full effect of the contained traits when turning them on/off rather than blending, set the blend in and/or blend out time to zero.
When testing in PIE, the Enable Contained Traits debug toggle in the Debugging category allows manual testing of the on/off behavior without requiring gameplay code to drive it.
Note that instance data is freed for re-use/returned to the shared pool when the contained traits are manually disabled, to ensure stale instance data doesn't end up being used on re-enable or switching to a different style.
Also note that unlike transitions between styles, when a blend time is specified, the trait container does an actual blend of the contained traits on and off, making its behavior more akin to the way Unreal's built-in camera modifiers work (which are also supported by the system).
Debug Traits
These included traits are used by the camera debugger, and likely not something you want to include in shipping camera styles.
| Trait Name | Description |
|---|---|
| Debug Look Input | Redirects look input between the game camera and the editor when using the camera debugger. |
| Debug Orbit | Handles orbiting around a selected point when using the default mode of the enhanced Debug Camera. |
| Style Inspector | Used by the Trait Inspector view of the enhanced Debug Camera for inspecting camera styles. |
Trait Instance Data
- Camera trait instance data is runtime data used by an instance of a particular trait.
- If there are multiple copies of a trait present - due to duplication in a camera style, or multiple cameras active due to running in split-screen or with multiple tracks - each trait instance will receive their own unique copy of the instance data.
Named Instance Data
- Some traits that use instance data will provide the option to name the instance data.
- Naming instance data allows consecutive camera styles that have the same traits to re-use the same already-initialized data from the previous style, to reduce/eliminate discontinuities.
- For example, you have smoothing/damping or gamepad look input acceleration applied to one camera style, and then switch to another that also utilizes that behavior - rather than stopping and restarting the effect, it can simply continue smoothly.
- This is somewhat similar to the way CameraModifiers work in stock Unreal, but with the key difference that you do not have to manually manage the state of camera traits.
Creating New Traits
- While the traits included with the camera plugin cover a wide range of game camera needs, sometimes some game-specific custom camera functionality is needed.
- You can write your own traits in Blueprint or C++ - including exposing tunable properties - and add and tune them in your camera styles, just like traits that come packaged with the plugin.
- If your traits need to retain information across frames, you can create a corresponding trait instance data class to store that information - just as with the built-in traits.
Creating/extending traits with Blueprint
- You can extend from RrCameraTrait in Blueprint or C++ to create custom traits.
- You can find an example Blueprint-created trait (BP_RrCameraTraitExample) the plugin's /BlueprintTrait subfolder
- This trait demonstrates adding a smoothly-interpolated world-space offset based on the character's velocity, for example purposes.
- Studio license customers can use the implementation of existing plugin traits in C++ - found in the /RrCamera/Traits subfolder - as a reference for building code-based traits.
- A complete documentation reference on building traits is in-progress and will be available prior to the 1.0 release.
Camera Targets
- Camera targets are essentially a generalization of the Unreal Engine concept of the "view target".
- Targets are referred to by gameplay tag, in the following format: Camera.Target.TargetName
Uses of Targets
Some of the implemented use-cases for targets:
- An attachment point to set the camera's base location and other POV information from.
- A target to look at, such as a point-of-interest or focused enemy.
- A safe point for collision to pull back toward, or ensure visibility/clearance to.
- A reference point for target-relative camera style transitions.
Types of Targets
View Target
- The View Target (Camera.Target.View) corresponds to the Engine-defined target of the same name.
- The Engine typically handles setting this target for you.
- The view target is usually set to the possessed pawn while playing (typically a player character), or the player controller/player state at times when there is no pawn available (such as while spectating, or before the character is spawned in).
- In most games, most of the time, the camera will be setup to attach to this target.
Collision-Safe Target
- Camera.Target.CollisionSafe is the default target used with the Collision Avoidance trait to determine where the camera pulls in toward in the event of a collision/blocked view.
- If Auto Set Collision Safe Target is enabled in the camera settings (Project Settings → Riveting Realms Camera), the camera manager will automatically sync this target to the view target.
Look-At Target
- This target is defined by the plugin for convenience as the default target for look-at type functionality.
- Because look-at targets are always game-specific, this target must be manually set in order to be used.
Pawn Target
- Target that is automatically/always set to the owning player's controlled pawn (if any).
- While the controlled/viewed pawn/character is usually the view target, the view target typically changes when using camera actors, Sequencer, etc. So if you need a reliable reference to the pawn specifically - such as for target-relative transitions - this target can be used.
Debug Target
- This target is used by the debug camera style inspector.
Game-Defined Targets
- You can add as many additional targets for your game as you like. Targets are identified by their associated Gameplay Tag.
- To add a target, simply add a gameplay tag for it (ie. Camera.Target.TargetName), and then you can reference that tag wherever camera targets are specified.
Setting a Target
- Targets are set per-player/camera manager, and may be set globally for all tracks, or for a specific track by track tag.
- A number of ways to set a target are exposed in both C++ and Blueprint, with or without a blend:
- Set Target by Interface - If you have an object or actor that implements the IRrCameraTargetInterface, you can set the target that way.
- The camera target interface allows you to write custom logic for updating the target's POV
- Set Target by Actor - Set the target to a specified actor; the derived POV will be based on the associated target settings and components that the actor has.
- If allowed to use camera components, the POV will be derived from the camera component.
- If a bone or socket name is specified, and the actor has a skeletal mesh component, the target will attempt to find that bone/socket and extract transform information from it.
- If no relevant components are found, the location/rotation of the target's POV will be set based on either the results of calling the GetActorEyesViewPoint() function if bCanUseActorEyesViewPointLocation/bCanUseActorEyesViewPointRotation are set, or GetActorLocation()/GetActorRotation() otherwise.
- Set Target by Location - This allows setting a target to a specific location, and optional orientation.
- Set Target by Camera View - This allows setting a target to a FRrCameraViewInfo - useful in some scenarios for "freezing" a viewpoint previously calculated for a camera track or target.
- Set Target by View Info - Similar to setting by camera view, this uses the engine's built in FMinimalViewInfo struct instead.
- Set Target by Interface - If you have an object or actor that implements the IRrCameraTargetInterface, you can set the target that way.
- You can also remove a target with RemoveTarget.
- Note that you can't remove the view target, due to it being tied to automatic/engine functionality.
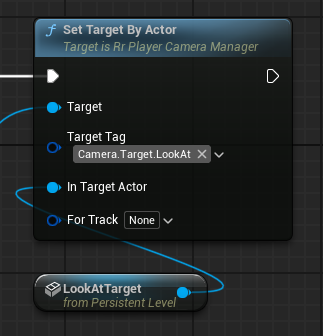
Blueprint Set Target Example
- Setting the Look-At target to an actor named LookAt in the level.
- No track is specified, so it will be set as a global target.
Target Parameters
- In addition to specifying what the target is, you can also specify parameters that determine the behavior of the target.
- Currently there are two ways to specify target parameters:
- Per-target defaults on the camera style
- Explicitly set parameters for a given target in Blueprint or C++.
- The RrPlayerCameraManager exposes Set Target Params and Clear Target Params for setting/clearing target parameters respectively.
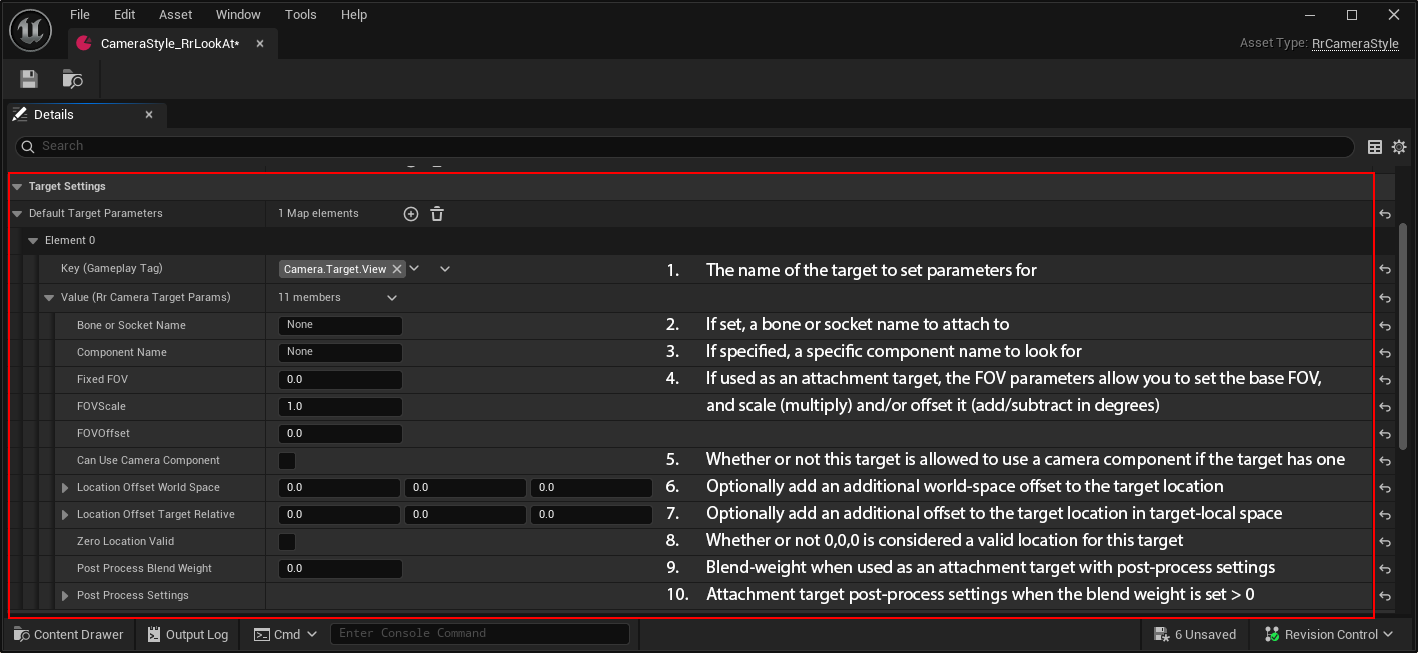
Target Parameters Settings
- Target Tag (Key) - The target to set parameters for, referred to by its gameplay tag.
- Bone or Socket Name - When attaching to a target actor with a skeletal mesh component, you can specify a bone or socket name to attach to on that component.
- Component Name - For actors with multiple skelmesh components and/or camera components, to disambiguate you can specify a specific component name so the target code will only look at the specific component whose name matches.
- Fixed FOV - When using the target as an attachment target with camera styles that derive FOV from the attachment target, and the target does not have a camera component or interface that specifies FOV a different way, you may sometimes want to set a fixed FOV for the target. FOV Scale - Allows you to apply a scaling modifier to whatever FOV would otherwise be computed for the target. FOV Offset - Allows you to apply an additive offset (in degrees) to whatever FOV would otherwise be computed for the target.
- Can Use Camera Component - If set, the target is allowed to look for and pull POV data from a camera component owned by the target actor.
- Location Offset World Space - Enables you to offset the computed location of the target in world space.
- Location Offset Target Relative - Enables you to offset the computed location of target in target-relative space (based on its rotation/orientation).
- Zero Location Valid - Some actors are spawned at the origin, and/or zero may be treated as "unset" - this option allows you to specify whether or not the world origin (0,0,0) is considered valid for the target.
- Post Process Blend Weight - When using a target as an attachment target, you can also specify post-process settings to apply to the camera, if the blend weight is > 0.
- Post Process Settings - The post-process settings to use, if the blend weight is nonzero, and the camera style is configured to copy post-process settings from the attachment target (bSetPostProcess is an option on the Attachment trait).
Example setting default target parameters on a camera style:
Camera Tracks
- A camera track is an independent viewpoint that keeps track of its own state.
- Active camera styles and their contained traits influence the track's output POV by making changes to its transforms and other data.
- Tracks are also responsible for handling their own transitions/blends.
- A single camera track can support an unlimited number of camera styles and targets, including smooth blending between those styles and targets. Additional tracks are only needed when your design requires keeping multiple viewpoints active/updated for the same player simultaneously.
Track POV Composition
The POV for a camera track is composed from several separate transforms:
- The OriginRotation (if set/used) and BaseView persist between frames, and are usually updated based on the current attachment target.
- Offsets are combined with the origin/base view.
- If a camera transition (blend) is active, it applies its contribution to the final output POV at the end.
Track Origin Rotation
- The origin rotation (new in 0.6) is the base layer that can apply an arbitrary rotation that everything else is based on.
- Standard camera setups in Unreal Engine assume a Z-up world orientation - the camera's base view rotation uses Euler angles (yaw, pitch, roll) relative to the world's vertical axis. This works well for the vast majority of gameplay cameras.
- For cameras that need to operate in non-standard orientations - such as cameras attached to vehicles that bank and pitch, cameras that orient to arbitrary surfaces, or any scenario where the camera's reference frame itself needs to rotate freely - the plugin provides an origin rotation system.
Track Base View
- The base view maintains the persistent base view of the camera track, including its point-of-view (location, Euler/FRotator-based rotation, FOV), and other related data, such as the aspect ratio, aspect ratio axis constraint, and post-process settings.
- The base view POV is usually set via attachment to a camera target, using the Attachment trait.
Track POV Offsets
Offsets are combined with the base view after the camera update is completed. This allows traits to contribute to offsets largely independently, and without repeating a lot of the same POV composition math in different locations.
- Offset lifetimes/persistence:
- Persistent offsets persist between camera updates, and are optionally reset on camera style changes, if bResetPersistentOffsetsOnBegin is set.
- Transient offsets get reset between camera updates.
- Traits that adjust transient offsets are expected to re-apply their changes to the offset for each update.
- Offset transform types:
- Origin Offsets are applied on top of the origin rotation (as described in Full Transform Composition Order) below).
- OriginPersistentOffset / OriginTransientOffset are location and rotation offsets applied in true world space. The rotation component uses quaternion multiplication.
- For most cameras that don't use origin rotation, these offsets are not needed.
- Base View offsets are applied in origin-relative space, and the rotation part of these offsets are additive with the base view rotation.
- BaseViewPersistentOffset / BaseViewTransientOffset are location and rotation offsets applied to the base view. These are transformed by the total origin rotation (origin rotation × origin persistent offset × origin transient offset), so they remain consistent relative to the origin frame.
- For cameras not using origin rotation, these behave equivalently to the former world space offsets.
- Note: WorldSpacePersistentOffset and WorldSpaceTransientOffset from previous versions are deprecated in favor of these.
- Local Space offsets are applied relative to the base view (and therefore also affected by any origin-level transforms).
- LocalSpacePersistentOffset / LocalSpaceTransientOffset are camera-local space offsets, applied after the base view and BaseView offsets. The rotation component is represented as an FRotator, but uses quaternion multiplication, allowing camera animation offsets and similar contributions to affect the final camera rotation without Euler-angle limitations.
- Transition offsets are used specifically during transition rotation matching calculations, separate from the runtime offsets above.
- OriginTransitionOffset / BaseViewTransitionOffset / LocalSpaceTransitionOffset allow traits to indicate offsets that should or should not be factored into the automatic rotation matching that occurs when transitioning to camera styles that allow free rotation.
- Origin Offsets are applied on top of the origin rotation (as described in Full Transform Composition Order) below).
- FOV Modifiers:
- FOVPersistentModifier / FOVTransientModifier modify the FOV, with each modifier having both an offset (additive, in degrees, base value 0.0) and a scale (multiplicative, base value 1.0).
- NOTE: In versions prior to 0.6, these were part of the World/Local space offsets. They are now handled through dedicated modifier properties for clarity, rather than being embedded in the offset structures. Also, AddToFOVOffset() from previous versions is deprecated. Use ApplyFOVOffset() for additive adjustments and ApplyFOVScale for multiplicative adjustments.
Full Transform Composition Order
The final camera POV (before/minus any active transition) is composed in the following order:
- Location: BaseView.Location + Total Origin Location Offset + Total BaseView Location Offset (transformed by total origin rotation) + Total Camera Local Space Location Offset (transformed by total origin rotation and base view rotation)
- Rotation (composed as quaternion multiplications/stacked rotations): Origin Rotation × Origin Persistent Rotation Offset × Origin Transient Rotation Offset × Total Base View Rotation (Euler angles; BaseView.Rotation + BaseView Offsets) × Total Camera Local Space Rotation Offset
- FOV: (BaseView.FOV + FOV Modifier Total Offsets) × FOV Modifier Total Scale
Track Types
Default Track
- The automatically created and activated Camera.Track.Default is the primary gameplay camera track.
Debugger Track
- When using the enhanced debug controller, the Camera.Track.Debug track operates the debug camera, separate from the output of the active gameplay track
- Because it operates on a separate track, using the style inspector doesn't affect the state of the gameplay camera.
Game-Defined Tracks
- To add additional track(s), first define a gameplay tag with the following syntax: Camera.Track.TrackName
- Because additional tracks may not be needed all of the time, tracks are manually started/stopped.
- Add Camera Track and Remove Camera Track on the RrPlayerCameraManager can be used to add/remove tracks at runtime in C++.
- Set Active Track can be used to switch the camera manager's active track.
- To set/change the camera style for a camera track other than default, specify its track name when setting the camera style.
Tracks as Targets
- Anywhere that a camera target may be specified, the tag name of a camera track can also be used in its place.
- In this way, you can layer the output of multiple tracks together, if your specific camera setup requires it.
- The camera system will keep track of dependencies, and compute the output of dependent tracks after the tracks they depend on.
- NOTE: Circular dependencies are not supported.
Camera Input
- Camera input serves as an generic interface layer between the game/game input processing and the camera.
- This allows traits to get relevant input in a controlled way, without digging directly into game implementation-specific details, such as trying to grab input objects, retrieve information directly from the character or movement components, etc.
- The default camera input implementation handles input after it's been processed by your choice of camera input systems, so it is fully compatible with Engine built-in camera handling.
Camera Input Configurable Properties
- InputType - The currently active input type.
- If not set manually/elsewhere, the camera input implementation will attempt to detect which camera input type is active for the current frame on update, and fallback to the input type used for the last frame if no input of any type is detected.
- LastFrameInputType - The input type that was active/considered active last frame.
- LookInputTouchIndex - When using touch input, which touch control index should be used for controlling look input.
- LookInputAnalogStick - For games that use analog stick controls, which analog stick controls camera look functionality. Note that if you want to change this/make it configurable, it should match the look input setup of the input component.
- AnalogStickAccelerationScale - Provides a means to globally scale Look Input analog stick acceleration for end-user control settings support.
- AnalogStickMaxAddedSpeedScale - Provides a means to globally scale the maximum angular velocity Look Input analog stick acceleration can add, for end-user control settings support.
Extending/Modifying Camera Input Behavior
- When writing your own custom traits, it's recommended - but not required - to route inputs through the camera input object, for the cleanest implementation.
- To do that, you can create your own camera input class that extends from the plugin base implementation, in C++ or Blueprint.
- The default input implementation for the RR camera system is the RrCameraInput class.
- You can extend from this class to modify functionality or build a custom implementation.
- Because input is likely to be something that many games will want/need to change, we provide the full C++ implementation at all plugin license levels.
- The camera input class to create/use is specified in the camera plugin settings.
- You can modify this setting to point to your custom camera input class/Blueprint.
Camera Settings
- You can access the camera settings via Edit → Project Settings... → Riveting Realms Camera (in the Plugins section)
Configurable Settings List
Default Style Name - This is the name of the default camera style for your game, and the style that the camera manager will attempt to start in.
Auto Push Camera Style Types - This is used to automatically push a given camera style when an associated actor type becomes the view target. By default, a couple of these come predefined:
Class Type Auto-Push Style Notes PlayerController RrFixed When the player controller is the view target, it can create a feedback loop between player controller location updates based on the camera, and camera updates based on the controller.
Auto-setting a style that does not set the camera based on the controller location is a workaround for that issue.CameraActor RrCameraActor When a camera actor becomes the view target, generally we want to view through the camera actor's camera component with no other modifications to the POV.
The RrCameraActor style packaged with the plugin permits the view target to use camera components for attachment, and pulls all base transform data from that camera component.Camera Track Class - The class type of camera track objects. Can be modified to accommodate projects that extend the camera track with custom functionality.
Camera Input Class - The class type of camera input objects. Can be modified to accommodate projects that extend camera input with custom functionality.
Transition Settings
- Transition Curve - The curve used to map transitions between camera/styles when the Curve algorithm type is specified for transitions. Pre-populated with a curve shape proven to work well for transitions in most scenarios.
Environment Collision Settings
- Environment Collision Curve - Curve used to map how the camera preemptively pulls in when camera environmental awareness is enabled for the Collision Avoidance trait.
- Trace Verify Environment Collision Results - Performs line-checks to verify results produced by the camera environment check. Can be expensive, and is disabled by default.
Restart settings
- Auto Reset Base Rotation on Restart - If set, automatically reset the camera's base rotation to the pawn/character's rotation on restart.
Lens Simulation Settings
- Sensor Sizes - When using FOV by Lens to set the FOV, the sensor sizes to use for computing the actual FOV and aspect ratio are sourced from here.
- You can define your own additional sensor sizes by adding associated Camera.Sensor.SensorTypeName gameplay tags.
- Several are provided with the plugin, but you can add your own.
- Sizes are specified in mm.
Aspect Ratio Settings
- Simulate Constrained Aspect Ratios - Simulate constrained aspect ratios with HUD-rendered black bars rather than actually changing the aspect ratio.
- When smoothly blending in and out of constrained aspect ratios, the constrained aspect ratio changes every frame. In stock Unreal, this triggers a buffer resize/reallocation every frame, which comes with a heavy performance hit, and added memory usage.
- Additionally, with the stock implementation, the black color bleeds into the post process, affecting the color of the rendered cinematic.
- To solve this problem, we offer the option to simulate the constrained aspect ratio rather than actually constraining it.
- If you disable this, we recommend avoiding blending/transitioning in and out of constrained aspect ratios, in favor of camera cuts.
- Note that this feature makes use of the PostRenderedActor HUD feature, and can conflict with other uses of that feature, as well as bShowOverlays.
Input Settings
- Scale Gamepad Input by Delta Time - The EnhancedCameraInput plugin is framerate-dependent by default, and - in newer versions of Unreal - input scaling logic is no longer present in default game template implementations such as the ThirdPersonTemplate.
- If your game code/Blueprint is already handling framerate-independent control stick look input scaling, you can/should safely disable this option.
- Gamepad Look Input Speed Scale - When scaling input by delta time, it also needs to be adjusted to achieve a reasonable base speed.
- Note that the speeds represented here in the settings are based on the axis of rotation, which is perpendicular to the actual rotation movement. Yaw rotation is "around Z", while pitch rotation is "around Y", and roll is "around X".
Debugging Settings
- Start Debugging Paused - Whether or not to pause the game when you activate the RR debug camera.
- Forward Input when Debugger Unpaused - Whether or not to forward input back to the game camera when using the RR camera debugger, and the game is in an unpaused state.
- Trait Inspector Blend Time - When using the trait inspector, you can adjust how it transitions from one trait view to another using this setting.
- (Set to zero if you would like it to cut/snap.)
- Initial Camera Debug State - Which state to start the RR debug camera in.
- Debug Trait View Style Name - Which camera style to use when the camera debugger is in Trait View.
- Debug Inspector Style Name - Which camera style to use when the camera debugger is in the style/trait Inspector View.
- Debug Orbit Style Name - This style mimics the behavior of the Engine default debug cam orbit behavior.
- Debug Free Cam Style Name - This style mimics the behavior of the Engine default debug free-cam behavior.
Camera Debugging
The RR camera plugin extends from Unreal's built in debugging functionality.
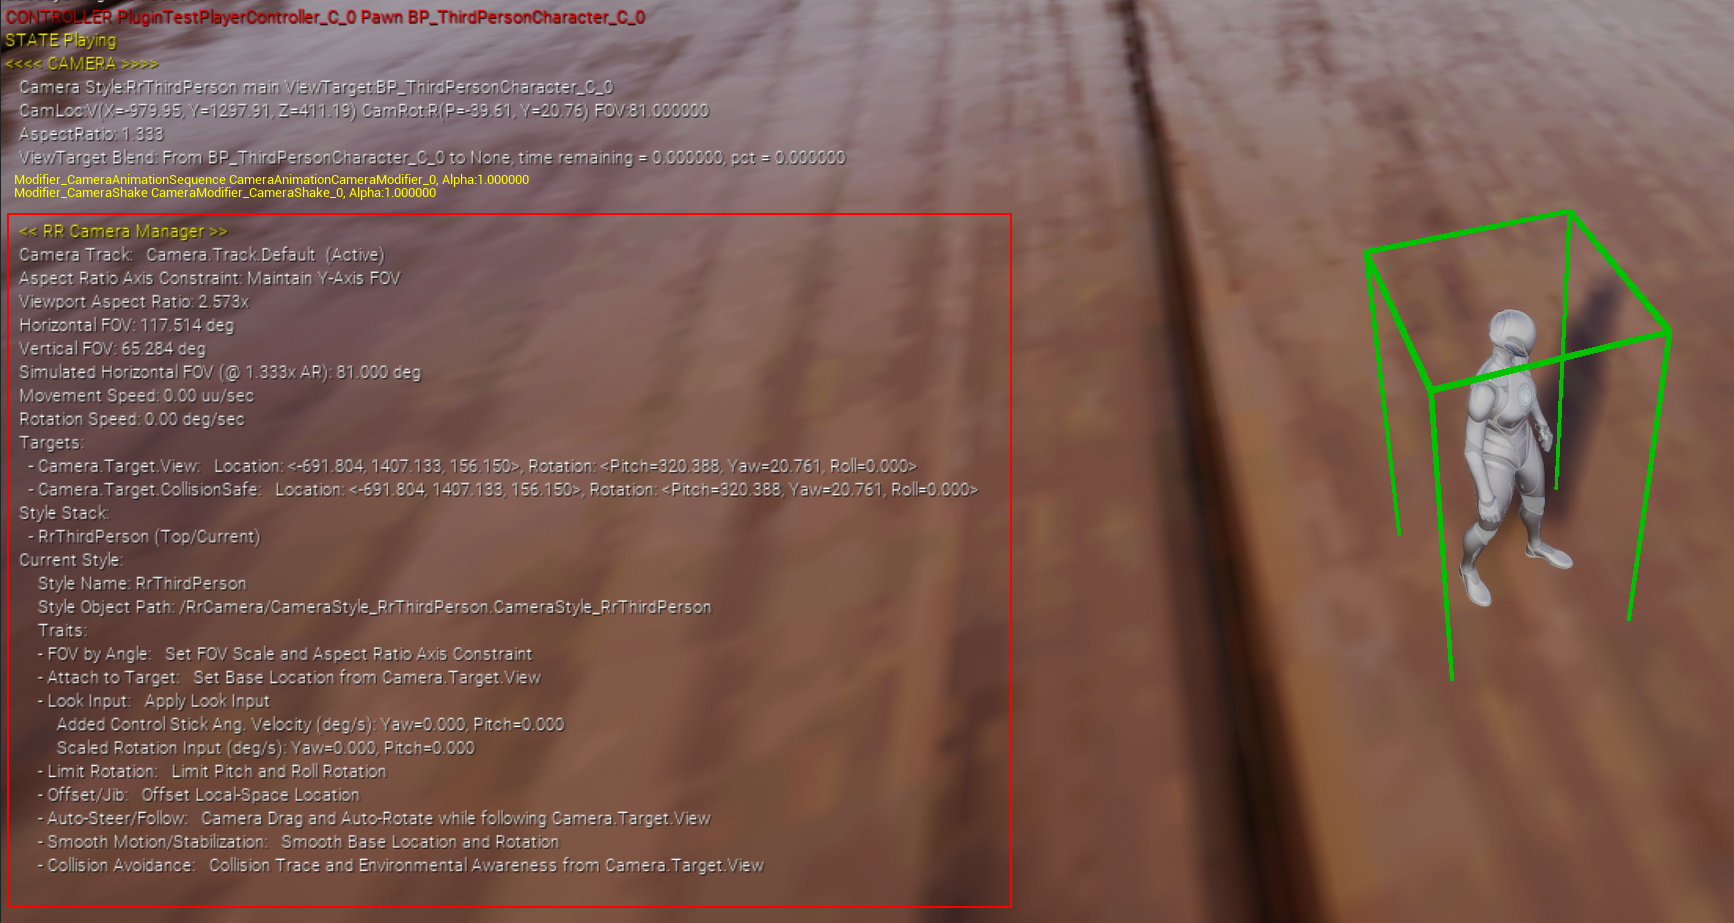
Enhanced "Showdebug Camera" Output
The engine built in showdebug camera command has been enhanced to show additional information with the RR camera plugin:
- Camera Track - Shows the active RR camera track.
- Aspect Ratio Axis Constraint - Shows which axis the aspect ratio is being constrained by. (Affects how the view scales when the viewport aspect ratio doesn't match the desired aspect ratio.)
- Viewport Aspect Ratio - The current aspect ratio of the viewport.
- Horizontal FOV - The current horizontal FOV.
- Vertical FOV - The current vertical FOV.
- Simulated Horizontal FOV - When the FOV is constrained on the Y-axis, this shows the target X-axis FOV and aspect ratio.
- Movement Speed - How quickly the camera is currently moving in uu/sec.
- Rotation Speed - How quickly the camera is current rotating in degrees/sec.
- Targets - Lists currently active camera targets, and their POV transforms (location/rotation/FOV).
- Style Stack - Lists camera styles currently on the camera manager's style stack.
- Current Style - Displays information about the track's currently active camera style.
- Style Name - The name of the active style.
- Style Object Path - Where the actual camera style asset is located.
- Traits - The list of camera traits that compose the style, and a brief description of what they are doing.
- Transition - When a transition is currently active, displays information about the in-progress transition between cameras/styles.
- Transition Time - The total time specified for the transition.
- Interpolation Algorithm - The algorithm selected for the transition.
- Transition Time Remaining - How much of the transition time is left before the transition will be complete.
Showdebug Camera Example
Using the Enhanced Camera Debugger
- If you've set up the RrCameraDebugController as your controller debug class, you can use its debug camera features to help debug your camera setups.
- Toggling the debug camera on and off is normally bound to ';' (semicolon) by default.
Trait Inspector View
- The trait inspector view provides a 3rd person view of how the camera traits combine together to produce the final output, with basis vectors to indicate the in-progress transform after each trait's changes are applied to the POV.
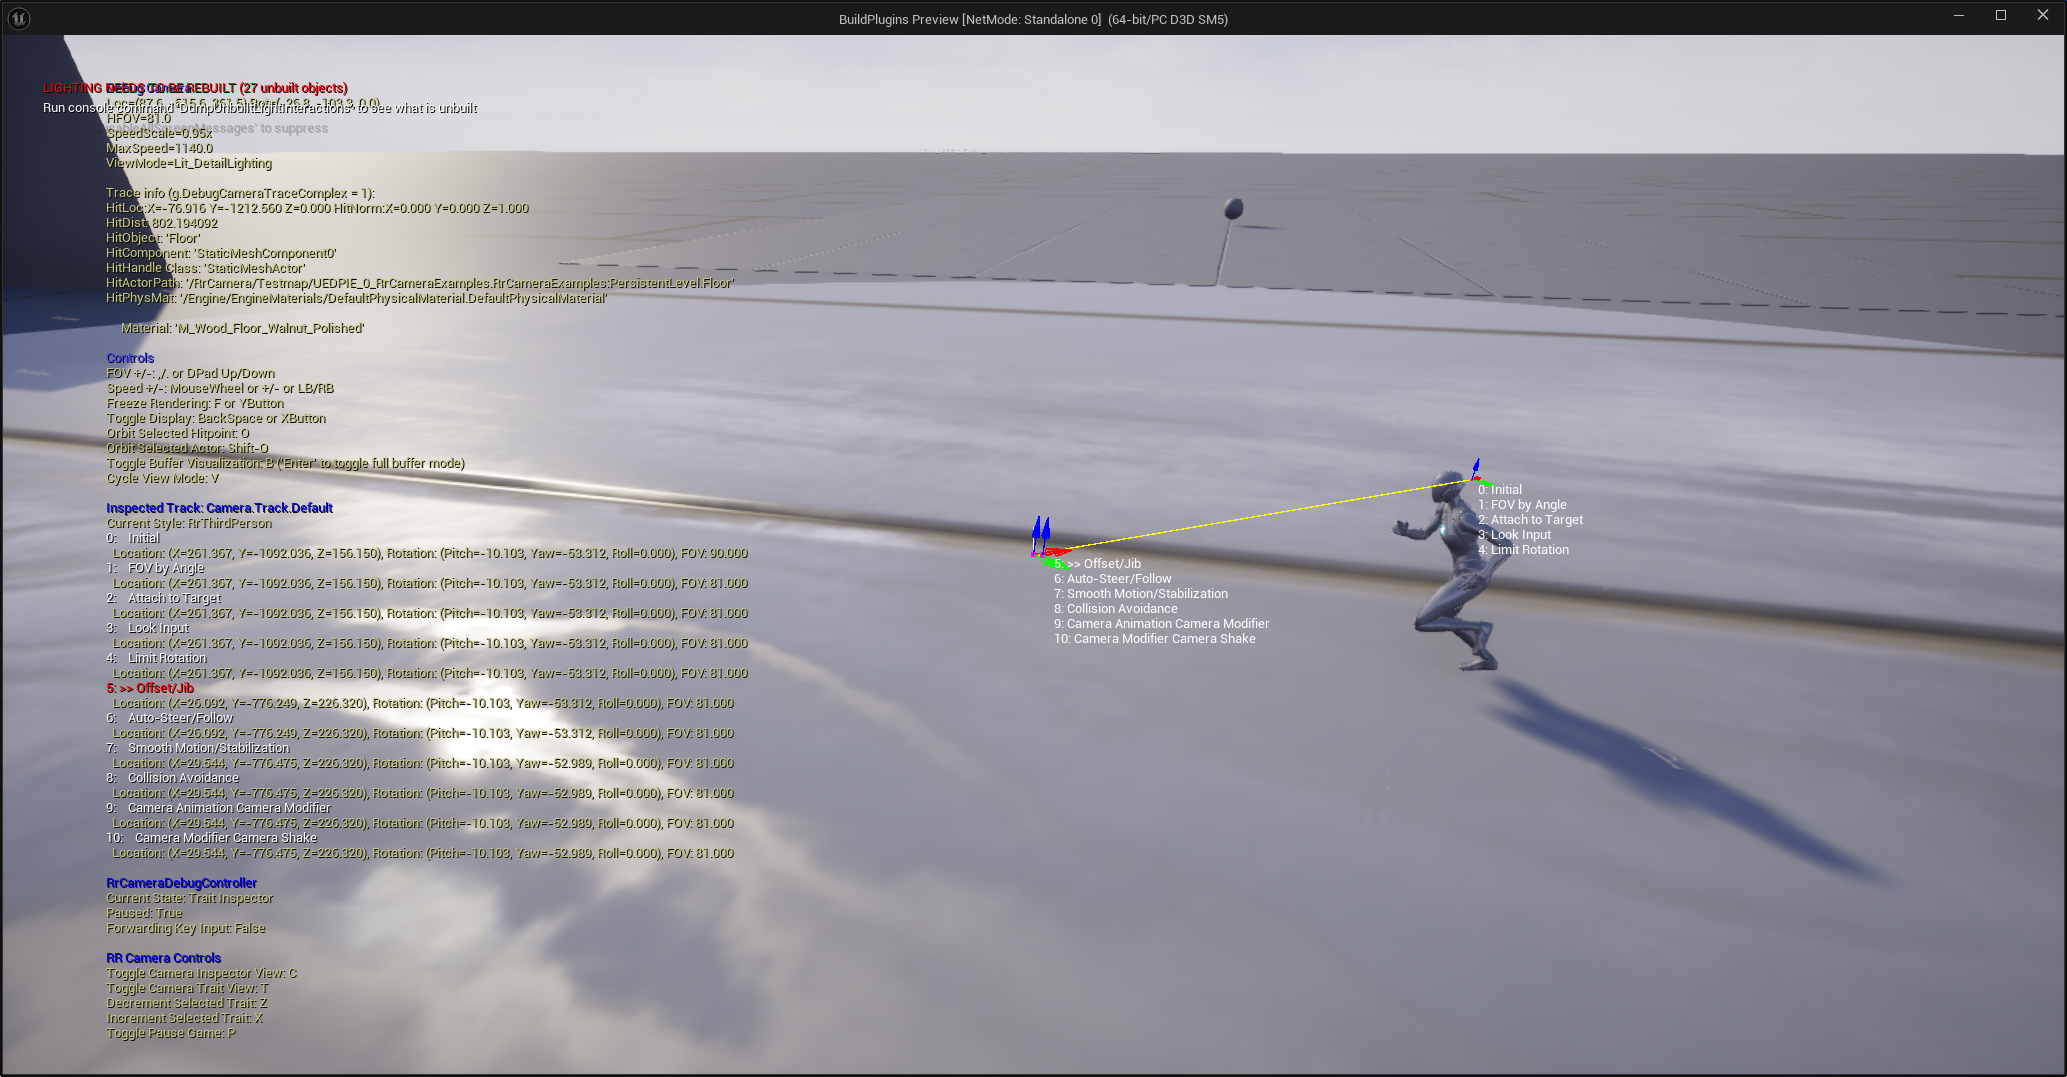
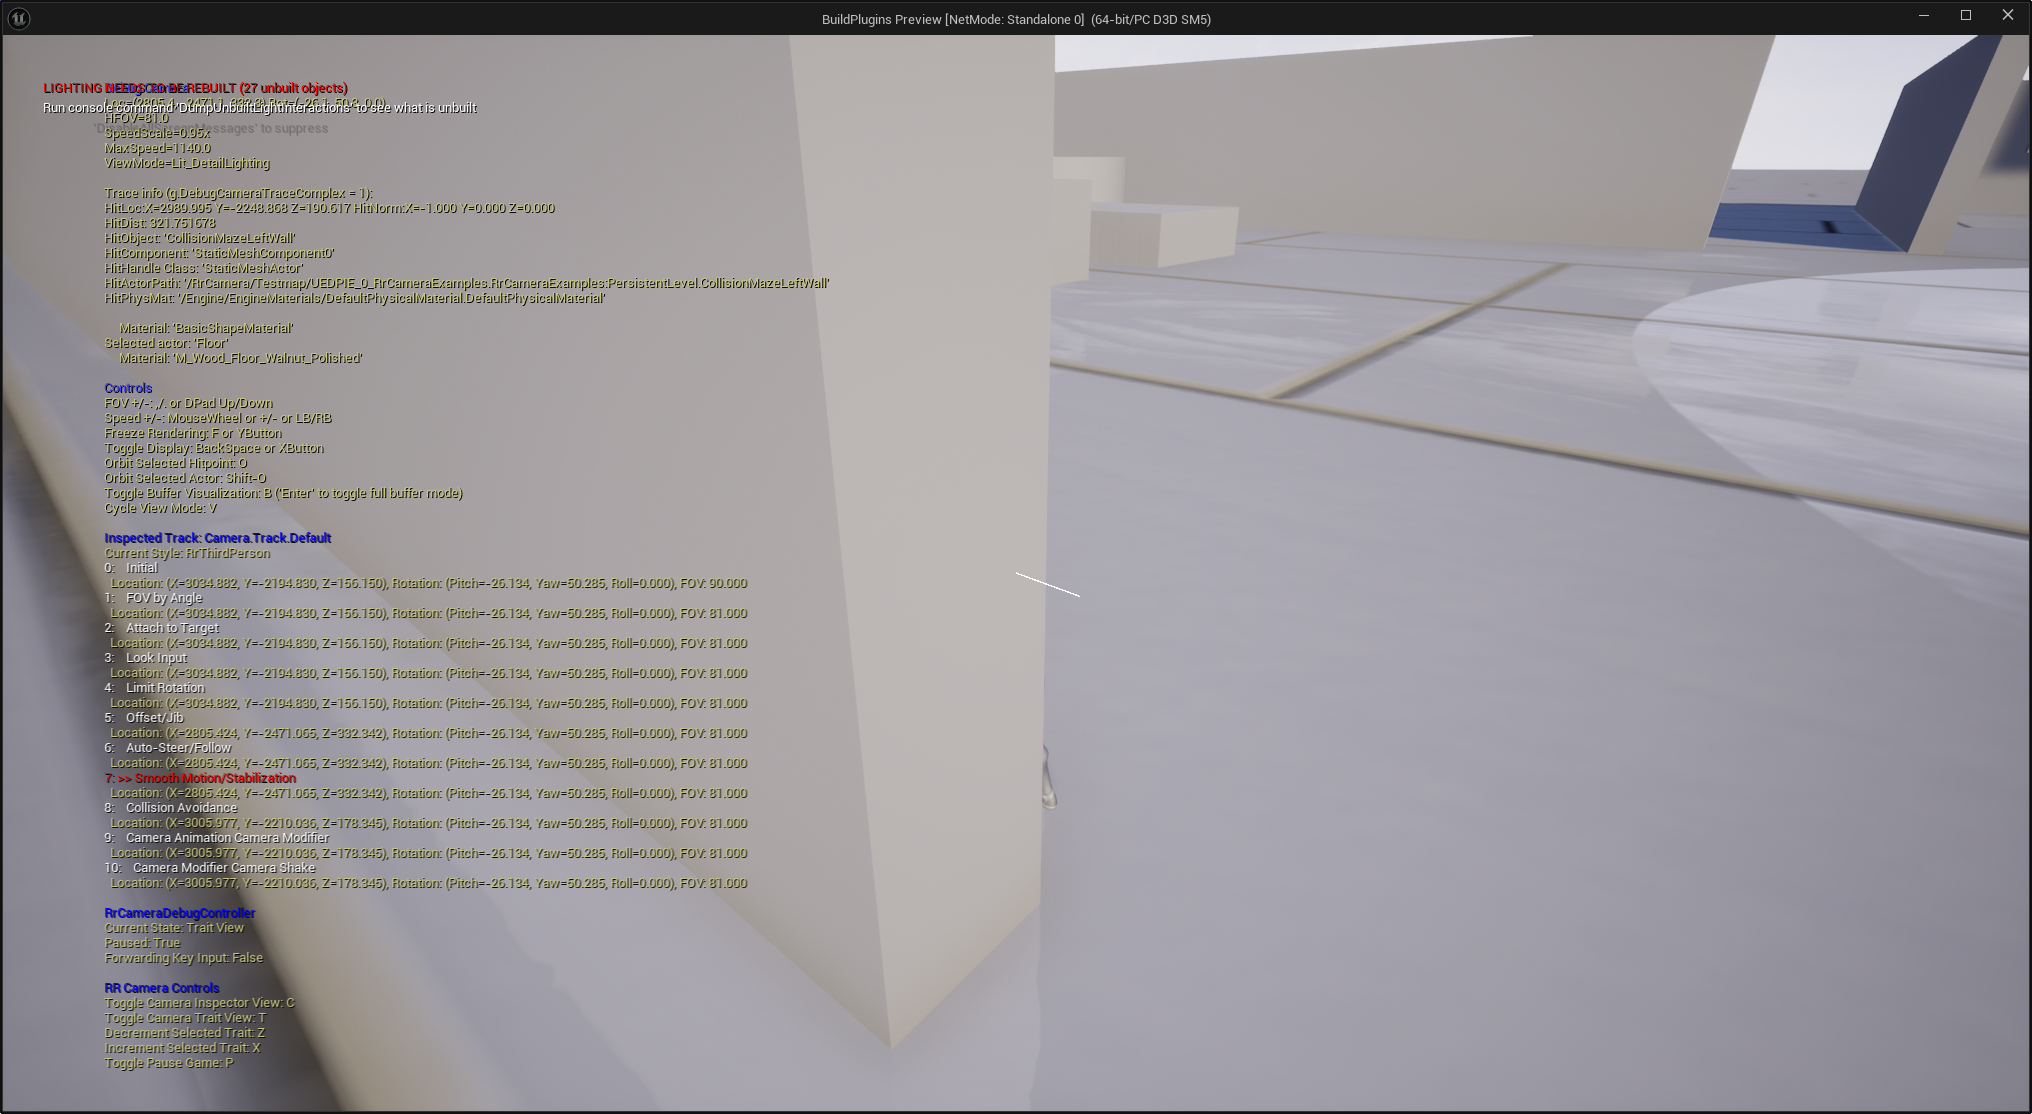
Trait View
- The trait view shows you the view as it was composed in stages, after each trait contributed to the final output.
- The example in this screenshot shows pre-collision camera output, because a trait that comes before Collision Avoidance in the style is selected.
Camera Debugger Controls
- The debug camera controls are shown on-screen while the RR camera debugger is active.
- Inherited camera controls from the Engine debug camera:
- 'O' - Orbit selected hitpoint.
- Shift+'O' - Orbit selected actor.
- Additional camera debug controls (these bindings are configurable in the plugin settings):
- 'C' - Switch to/from the trait inspector view.
- 'T' - Switch to/from trait view.
- 'Z' - Decrement the currently selected trait, in the trait inspector and trait views.
- 'X' - Increment the currently selected trait, in the trait inspector and trait views.
- 'P' - Toggle pause game - allows you to switch back and forth between a paused and unpaused state without leaving/resetting the debug camera.
- All non-camera-controlling debug controls for buffer visualization, view modes, etc., are expected to work as normal.
Enabling/Disabling Traits
- While editing, you can also uncheck the Enabled flag in the Debugging category on individual traits in the camera style asset to disable them.
- Provides an easy method to do quick A-B testing with or without a specific trait being enabled.
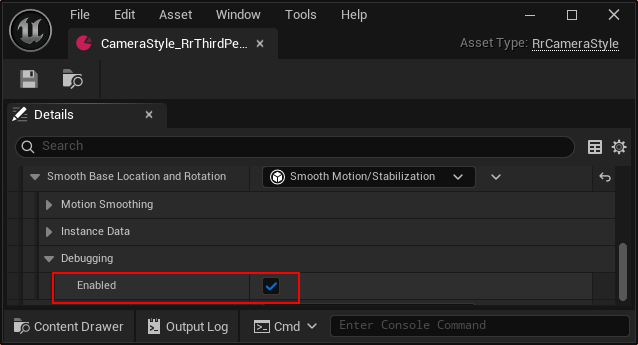
Spline Cameras
Spline cameras allow you to define a camera path that follows a player or other target as they move through a specific area of your level. Rather than hand-placing camera positions, the camera path is authored using a Sequencer sequence, which is then baked into a reusable RrCameraSplineDefinition asset and played back at runtime via a RrCameraSplineActor placed in the level.
Import Settings
Once your sequence is authored, create a Camera Spline Definition asset and point it at your sequence. The following import settings control how the data is extracted:
| Setting | Description |
|---|---|
| Use Camera Cut Track | If enabled, uses the sequence's camera cuts track for camera bindings. Disable to specify a named camera actor binding instead. |
| Camera Binding Name | The name of the camera actor binding to use, when not using the camera cuts track. |
| Player Binding Name | The name of the player stand-in binding in the sequence. |
| Player Spline Max Segments | Maximum number of segments the extracted player spline can have. |
| Player Spline Simplification Location Error Threshold | Maximum location error allowed when simplifying the player spline by removing unnecessary points. |
| Player Spline Simplification Alpha Error Threshold | Maximum spline alpha error allowed during player spline simplification. |
| Always Evaluate All Camera Component Interp Values | Forces all interpolated camera values to always evaluate. Otherwise interp values update only with the final camera update each frame. Has a runtime cost; use only if needed. |
| Camera Component Interp Values to Always Evaluate | Specific camera properties to flag as always-evaluated, for proper player/input orientation calculation, and smooth transition support. FOV-related and filmback settings are included by default. |
After configuring import settings, click Import/Reimport Data from Spline Sequence to bake the data into the definition asset. This also happens automatically on save and load for editor/uncooked versions of the asset.
Placing a Camera Spline in the Level
To use a spline camera at runtime, place an RrCameraSplineActor in your level and assign your Camera Spline Definition to it.
When the camera's view target is set to the spline actor - which can be set in code or Blueprint - the camera spline actor will automatically map the player's current location to the nearest point on the player spline, and update the camera viewpoint accordingly.
Authoring Camera Splines in Local Space
To author a spline camera that plays back relative to the spline actor's transform:
- Place both an RrCameraSplineActor and a LevelSequenceActor in the level.
- Set the Level Sequence Actor's sequence to your camera spline sequence.
- On the Level Sequence Actor, expand the Instance Data category and enable Override Instance Data, then set the Transform Origin Actor to the camera spline actor.
With this setup, the transforms in the sequence are interpreted relative to the spline actor's location and orientation, allowing the same spline definition to be reused in different positions and orientations simply by moving the spline actor.
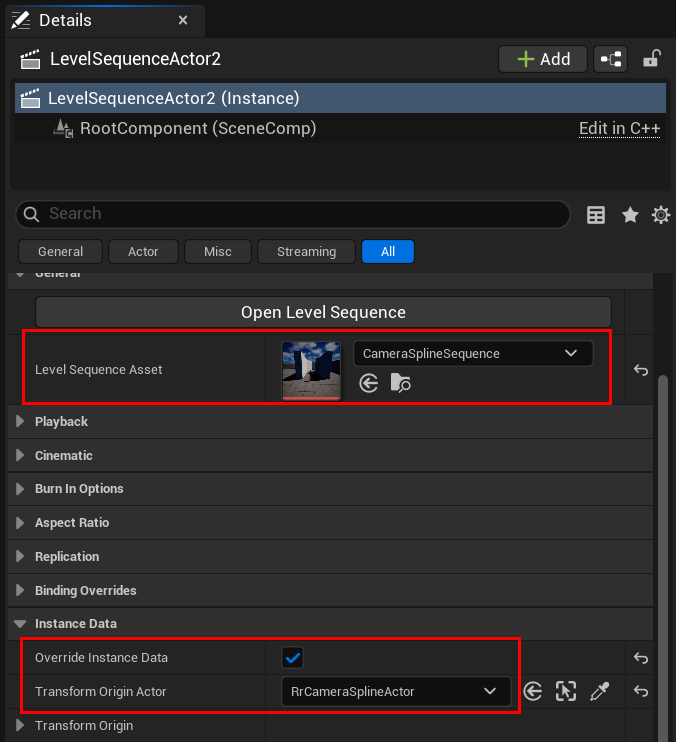
Camera Spline Playback
- To play back a camera spline at runtime, set the camera view target to a RrCameraSplineActor previously placed in the level.
- The camera spline actor will automatically update the camera POV based on the associated camera spline definition, and playback settings.
Camera Spline Playback Settings
Playback behavior can be configured on the Camera Spline Definition as default settings, or overridden per-instance on the Camera Spline Actor:
| Setting | Description |
|---|---|
| Follow Target | The camera target to follow and map onto the player spline. Defaults to the pawn target. |
| Initial Segment Search Method | How to find the starting position on the spline when playback begins. Options: Nearest End (default), From Start, From End, From Middle. |
| Override Camera Style Name | If set, overrides the camera style used during spline camera playback. |
| Smooth Position on Spline | When enabled, smooths the calculated position along the player spline to reduce jitter. Introduces some lag. |
| Spline Smoothing Settings | Smoothing parameters used when position smoothing is enabled. |
| Camera Style Priority | Priority for the auto-pushed camera style. Default is 0. |
| Offset Camera Location with Player Location | When nonzero, offsets the camera position by a percentage of how far the player is from the player spline along each respective axis (0.0 = camera stays at the Sequencer-keyed position; 1.0 = camera moves an equal amount from the keyed position). |
Local-Space Camera Spline Playback
The Play in Local Space option on the camera spline actor plays the sequence relative to the actor's transform, rather than in world-space. This allows you to place and orient the spline actor in the level to reuse the same spline definition in different locations or orientations. (See Authoring in Local Space to author the spline in local space to match.)
Camera Spline PIE Testing Workflow
When iterating in Play-in-Editor, the Include Unsaved Changes in PIE option on the spline actor allows you to test modifications to the camera spline definition without saving the asset first.
Multi-Section Camera Splines
If your sequence uses a camera cuts track with multiple sections - each section using a different camera actor - the spline definition will store each section's camera data separately. At runtime, the system determines which section applies based on the current position along the player spline, and switches between sections accordingly.
Camera System Integrations
Integration with Sequencer for Cinematics
- When Sequencer is active, a camera cuts track (base Engine functionality) controls setting the view target/switching between camera actors controlled by the sequence.
- The RR camera plugin then sources POV information from the active camera actor, and faithfully replicates the POV and any Sequencer blends - so you can author your Unreal-based cinematics in the editor as you normally would, and they will play back as normal in-game.
- When starting/stopping a cinematic, the RR camera plugin can handle smoothly blending in and out of the cinematic, including blending into/out of constrained aspect ratios.
- ARrCameraActor and ARrCineCameraActor can be added into Sequencer sequences to use camera styles in sequences, and can also be placed directly into levels.
Example Blueprint for blending to/from a Level Sequence
Example screenshot showing how to play a level sequence with smooth blend in/out, from the RrCameraExamples testmap included with the plugin.

Integration with the UE5 GameplayCameras Plugin
- While the RR camera plugin does not have any special integration with the GameplayCameras engine plugin as of the early-access release, the RR plugin does support blending back and forth between camera styles and GameplayCameras-controlled camera actors.
Integration with Other Camera Plugins/Systems
If you have existing cameras you would like to integrate with, or would like to use other plugins, etc., in specific scenarios, it's usually easy to make them work with the RR camera system.
Integration via CameraActors/CameraComponents
If the plugin or system uses CameraActors and/or CameraComponents - similar to Sequencer camera tracks, or GameplayCameras camera actors as described above - setting the appropriate target and attaching to it, with a camera style that uses the Attachment trait - and allowing that target to use camera components - may be sufficient for integration.
Integration via a Custom Trait
You can also write your own trait in Blueprint or C++ that takes the output of the other camera system/plugin, and uses it to set the camera base transform, and/or any other relevant camera variables accordingly.
Getting Support
If you need help with getting set up, anything talked about in this document, or something specific - as well as suggestions and feature requests - various methods of getting in touch with Riveting Realms and other camera system users are available on our Support page.